


With Annabelle going to a Montessori daycare I’ve been reading about what kind of educational approach Montessori education takes. While scouring the internet I saw some great toys that I thought I could sew. I thought sensory bags would be great for her at this age.
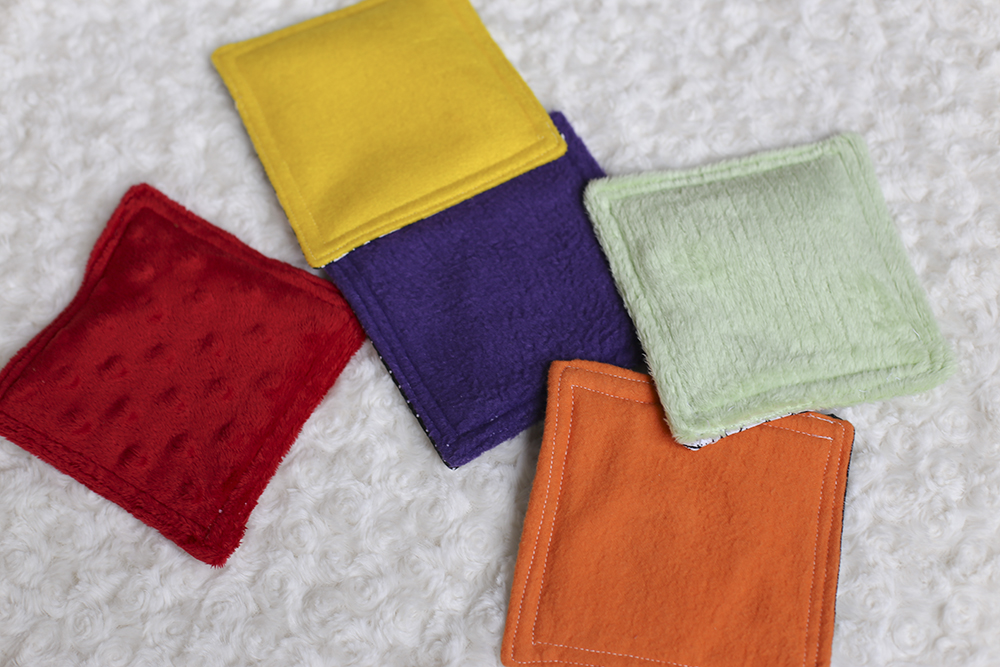
Each sensory bag is a different color and fabric, designed to stimulate the visual and tactile senses. On the opposite side of the bags are black and white patterned fabric. Each of the bags are filled with something different to encourage exploration. They say these bags are great for color learning, touch discovery, and hand/eye coordination. Right now Annabelle’s favorite squares are those with really textured fabrics and that make some kind of noise. And later on she’ll be interested in the ones with other types of materials. I personally think they’re great because they’re simplistic toys that have endless possibilities and they were made by me.
Materials you will need:
- 10 different colored and textured fabrics
- Cotton fabric (I used a variety of black and white patterned fabrics)
- Quilt batting
- Various materials for filling: small bells, lima beans, popcorn, lentils, poly fill, kidney beans, garbanzo beans, leftover fabric, leftover chip bag, plastic bag, etc.
- Sewing materials

Step 1. Find and cut out fabric. I found 10 different colored fabrics (pink, red, orange, yellow, green, blue, purple, brown, gray, black) in a variety of different textures including cotton fabric, corduroy, chenille, flannel, dot minky, fleece, etc. I also searched my fabric stash and found all of the black and white patterned cotton fabric. Each bag ends up being 5″ x 5 “, so I cut each of the colored fabric, black and white patterned cotton fabric, and quilt batting square 5.5″ x 5.5”. In the end I have 10 different colored squares, 10 black and white squares, and 10 square pieces of batting.
Step 2. Assemble squares. I stacked each of my squares to prepare them for cutting. The easiest way for me was to stack a black and white square to one of the colored fabrics, right sides together. Then I put a quilt batting square on the bottom so that when layered it went quilt batting, colored fabric and then black and white fabric. I found this easiest to sew. Make sure to pin all three layers together.
Step 3. Next, sew three and a half sides together with a quarter inch seam. Once you’re done sewing you need carefully cut the corners so that when you turn everything right side out the corners lay nicely. Now, turn your bag right side out so the quilt batting is in the middle and the colored fabric and black and white fabric is on the outside. I used a mechanical pencil to make sure the corners came to a T.
Step 4. Iron squares to help them lay flat. I also ironed the edge that wasn’t sewing under so that it would be easier to sew later.
Step 5. Fill square with filling (small bells, lima beans, pop corn, lentils, poly fill, kidney beans, garbanzo beans, leftover fabric, leftover chip bag, plastic bag, etc.). I wanted to find 10 different fillings to give Annabelle 10 different sensory experiences so I went as far as to wash out a leftover bag of chips and cut it into a square that could fit into a bag. Annabelle really likes things that make noise right now so I bought small bells at the craft store to put into one of the bags as well. Be careful when filling the bags because you’ll be sewing around the outside of the square so I always tried to keep everything in the center of the bag, making it easier to sew.
Step 6. The final step is to sew the square together. After filling a bag with one of your fillings, sew as close to the edge of the fabric as possible to close the entire bag. Then go back and sew a quarter of an inch to a half inch from the edge of the bag to give it a nice finished look.